Configuration Management with Azure App Configuration, Key Vault and Azure-managed identity

NOTE: This article assumes you have a good handle on Azure-managed Identity and Key Vault. If not, links to more information can be found throughout the article.

What is Azure App Configuration?

Software products store application configuration either on the code itself or on external configuration files. Modern, cloud-based applications rely on substantially more configuration data than traditional applications do, and this configuration is usually deployed to multiple environments. If you have worked on smaller services, you may have copied the same configuration onto multiple services, which makes maintaining them much more challenging.

Azure App Configuration provides an easy way out. This innovative, Azure-managed service helps developers to centrally maintain application settings and feature flags. All distinct components, along with all settings, are stored in a single, secure place. Simply put, Azure App Configuration has been designed to help developers optimise their work, be more secure, and avoid duplication or out of synch. data which makes them more productive end-to-end.

Why Azure App Configuration?

We have established that developers need a centralized and robustly secure platform for managing and scaling cloud-based applications efficiently. Azure App Configuration serves this purpose. Although almost all cloud-based applications can benefit from the App Configuration, some can maximise the advantages which the service provides as follows:

  • Serverless apps based on event-driven, stateless compute apps or other Azure functions.
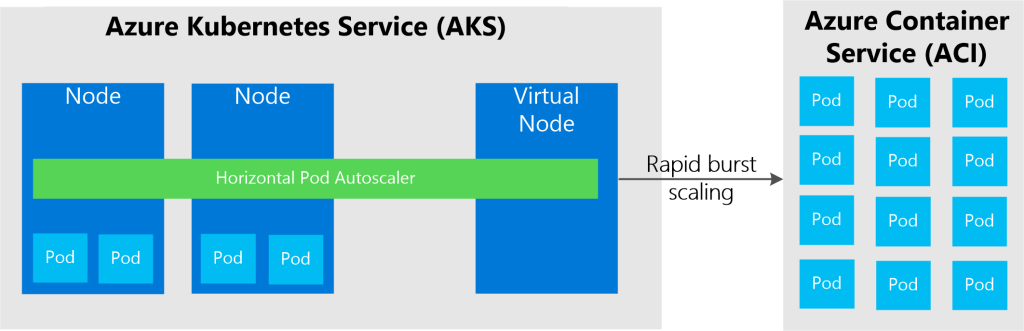
  • Microservices apps that include containerized apps such as Azure Kubernetes Service, Azure Service Fabric, and deployed in one or more geographical zones.

The benefits offered by the App Configuration include:

  • set up in a few minutes and provides point-in-time replay of settings
  • built-in support for Azure managed identities to help your website  
  • flexible key mappings and representations
  • increased code security de through Azure-managed identities
  • complements Azure key vault and simplifies real-time control of the availability of all features
  • quick and efficient integration with other well-known frameworks.
  • strong security or encryption of sensitive data, both at rest and in transit
  • compares two different sets of configurations based on custom-defined dimensions
  • user interface for feature flag management

Many more features are available; read about them here https://docs.microsoft.com/en-us/azure/azure-app-configuration/overview

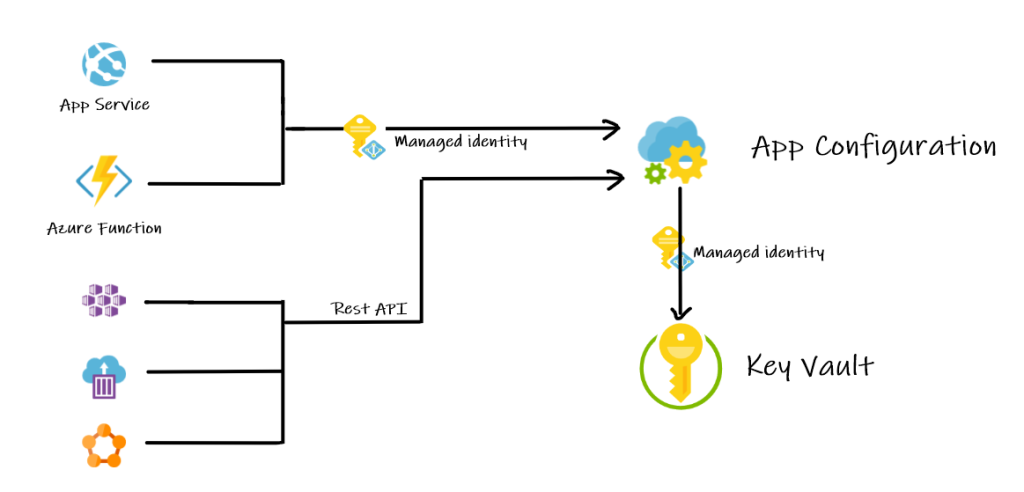
App Configuration integration with Key Vault

Modern applications consist of secrets, keys, and configuration. Even though Azure App Configuration can keep secrets and keys, App Configuration is not designed to do this. Therefore, we need a combination of Azure App Configuration and Key Vault.

This article demonstrates how you can take advantage of Azure App Configuration with Azure-managed Identity and Key Vault.

Prerequisites

  • Azure account with a subscription
  • Azure CLI
  • Coffee

Create an App Configuration store

To create a new App Configuration store, sign in to the azure cli.

az login

If you have multiple subscriptions, please select the subscription.

az account set --subscription “subscription name” 

Let’s create App Configuration and resource group

az group create --name SotronConfigStore --location NorthEurope
az appconfig create --name TestAppConfigStore --location NorthEurope --resource-group SotronConfigStore --sku Free

Enable system-assigned identity for this configuration store

az appconfig identity assign --name TestAppConfigStore --resource-group SotronConfigStore

Create Key Vault

az keyvault create --location NorthEurope --name SotronKeyStore --resource-group SotronConfigStore

Add a secret to Key Vault

az keyvault secret set --vault-name SotronKeyStore -n welcomeMessage --value "Hello from KeyVault"

Allow App configuration to access secrets.

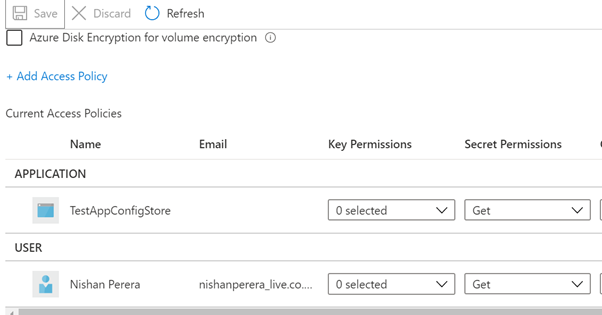
Before you run the following script, replace {object-id} with TestAppConfigStore object Id

az keyvault set-policy --name SotronKeyStore --object-id {object-id} --secret-permissions get

Create App Setting referencing Key Vault secret

Let us add configuration which references the Key Vault secret we have created. Please replace the identifier with your identifier.

az appconfig kv set-keyvault -n TestAppConfigStore --key welcomeMessage --label dev --secret-identifier https://sotronkeystore.vault.azure.net/secrets/welcomeMessage/4cfd3d38c8924436a8af205c94839a13

Access App Configuration using .NET application

Github repo: https://github.com/nishanperera/Azure-App-Configuration-With-Key-Vault

Create a default an ASP.Net Core Web Application and install “Azure.Identity” package make sure to install the preview version.

Install-Package Azure.Identity -Version 1.2.0-preview.4

Add the following to appsetting.json

"AppConfig": {
    "Endpoint": "https://{yourAppConfigurationEndpoint}.azconfig.io"
  }

Replace CreateHostBuilder with following.

public static IHostBuilder CreateHostBuilder(string[] args) => 
            Host.CreateDefaultBuilder(args)
                .ConfigureWebHostDefaults(webBuilder =>
                    webBuilder.ConfigureAppConfiguration((hostingContext, config) =>
                    {
                        var settings = config.Build();
                        var credentials = new DefaultAzureCredential(
                            new DefaultAzureCredentialOptions
                            {
                                ExcludeVisualStudioCredential = true
                            });
                        config.AddAzureAppConfiguration(options =>
                        {
                            options.Connect(new Uri(settings["AppConfig:Endpoint"]), credentials)
                                .ConfigureKeyVault(kv =>
                                {
                                    kv.SetCredential(credentials);
                                })
                                .Select(KeyFilter.Any, "dev");
                        });
                    }).UseStartup<Startup>());

Now you can access the configuration using:

Configuration["welcomeMessage"]

To run the code locally

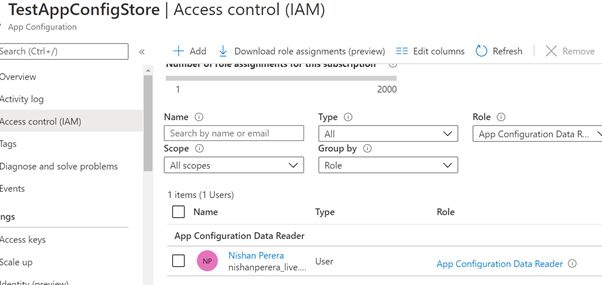
Grant the “App Configuration Data Reader” role to your user account.

Next, grant access to Key Vault.

Scale Selenium Tests in an Azure Kubernetes Service (AKS) with Virtual Node (ACI)

Information Technology plays a major role in today’s world to provide better solutions for the day to day problems faced by the different sectors in the market. Time is the most vital component of any process which should be monitored and managed in order to provide timely solutions. Continues improvement is a must and the companies strive towards scalable and fault-tolerant distributed systems. Proper QA processes should be in place to ensure a bug free application.

Software developers and solution providers have been working on innovative ways to automate the testing process to provide efficient solutions. The automated solutions require more resources to process. Specially, the tests depend on browsers.

If you or your team facing these issues now, please checkout the below solution which may have an answer to your current problems.

What is a virtual node?

Azure Kubernetes virtual node allow Azure Kubernetes Service to elastically provision additional pods without deploying VM computer nodes. Virtual node provisions Pods using Azure Container Instances that start in seconds.

https://docs.microsoft.com/en-us/azure/aks/virtual-nodes-portal

Why Selenium Grid on AKS and Virtual node?

There are so many ways to setup Selenium Grid, on the cloud. But if you already have a Azure Kubernetes cluster, why not run your tests on Azure Kubernetes Service. When you use virtual node, you only pay for execution time. On top of that you can scale up and scale down depending on demand using Horizontal Pod Autoscaler.

Virtual node run Pods on Azure Container Instances (ACI), so you don’t need to wait for the Kubernetes cluster autoscaler to deploy VM compute node to run the additional pods.

Let’s dive into setting up.

Prerequisites

  • Lots of coffee
  • Git / VS Code
  • An Azure account with a subscription
  • Azure CLI installed and configured
  • kubectl: Kubernetes command line tool

Creating AKS with virtual nodes

Please refer to the following link to setup an AKS with virtual nodes.

https://docs.microsoft.com/en-us/azure/aks/virtual-nodes-portal

This might take several minutes. Once the cluster is created, you can connect to it using your preferred editor or terminal.

Create Hub and Nodes

Once you’ve connected to the cluster, create a Selenium Hub by running the following command.

You can download all yaml files from https://github.com/nishanperera/Selenium-Grid-on-AKS-With-Virtual-Nodes

kubectl apply -f https://github.com/nishanperera/Selenium-Grid-on-AKS-With-Virtual-Nodes/blob/master/hub-AKS-deployment.yaml
apiVersion: apps/v1
kind: Deployment
metadata:
  name: selenium-hub
spec:
  selector:
    matchLabels:
      app: selenium-hub
  template:
    metadata:
      labels:
        app: selenium-hub
    spec:
      containers:
      - name: selenium-hub
        image: selenium/hub:3.141
        resources:
          limits:
            memory: "128Mi"
            cpu: ".5"
        ports:
          - containerPort: 4444
        livenessProbe:
          httpGet:
            path: /wd/hub/status
            port: 4444
          initialDelaySeconds: 30
          timeoutSeconds: 5
        readinessProbe:
          httpGet:
            path: /grid/console
            port: 4444
          initialDelaySeconds: 30
          timeoutSeconds: 5
      nodeSelector:
        kubernetes.io/role: agent
        beta.kubernetes.io/os: linux
        type: virtual-kubelet
      tolerations:
          - key: virtual-kubelet.io/provider
            operator: Exists
          - key: azure.com/aci
            effect: NoSchedule

Run following to see hub pod

 kubectl get pods

Next, you will need to create the service, so external traffic can be sent the hub.

Kubectl apply -f https://github.com/nishanperera/Selenium-Grid-on-AKS-With-Virtual-Nodes/blob/master/hub-AKS-service.yaml
apiVersion: v1
kind: Service
metadata:
  name: selenium-svc
  labels:
    app: selenium-svc
spec:
  selector:
    app: selenium-hub
  ports:
  - port: 4444
    targetPort: 4444
  type: LoadBalancer

View the service details by running the following command.

kubectl get service selenium-svc
service

you can view the hub by browsing external-IP with port 4444

http://external-ip:4444/wd/hub/status

you should see following page

hubpage

Next, we deploy the chrome node to azure ACI. Before you run the yaml file Please replace the Selenium hub IP on yaml file to your hub IP.

Kubectl apply -f https://github.com/nishanperera/Selenium-Grid-on-AKS-With-Virtual-Nodes/blob/master/chrome-node-AKS-deployment.yaml
apiVersion: apps/v1
kind: Deployment
metadata:
  name: chrome-node-rc
  labels:
    app: chrome-node-rc
spec:
  replicas: 1
  selector:
    matchLabels:
      app: chrome-node-rc
  template:
    metadata:
      name: chrome-node-rc
      labels:
        app: chrome-node-rc
    spec:
      volumes:
        - name: dshm
          emptyDir:
            medium: Memory
      containers:
        - name: chrome-node-rc
          image: selenium/node-chrome-debug:3.141
          ports:
            - containerPort: 5555
          volumeMounts:
            - mountPath: /dev/shm
              name: dshm
          env:
            - name: HUB_HOST
              value: "10.0.27.181" 
            - name: HUB_PORT
              value: "4444" 
          resources:
            limits:
              memory: "1000Mi"
              cpu: "500m"
      nodeSelector:
        kubernetes.io/role: agent
        beta.kubernetes.io/os: linux
        type: virtual-kubelet
      tolerations:
          - key: virtual-kubelet.io/provider
            operator: Exists
          - key: azure.com/aci
            effect: NoSchedule

Scaling in action

AKS supports both manual and auto scaling. but for this you will be using auto scaling with HPA (Horizontal Pod Autoscaler)

Run following to setup HPA, notice triggered metric here is cpu-precent. when average of all pods’ cpu-percentage more than 40%, AKS will create a new pod in ACI and schedule it to run.

kubectl autoscale deployment chrome-node-rc --cpu-percent=40 --min=1 --max=5

If you are not running any tests, you should only see hub and one chrome node.

hubandnode
onenode

Let’s send some traffic to Selenium Grid by running C# tests.

You can check HPA by running following

hpabasic

After few minutes, you will see replicas will increase and decrease.

hpadetail

Known limitations on virtual node

Can’t mount config map to Virtual Kubelet https://github.com/virtual-kubelet/virtual-kubelet/issues/523

References

Horizontal Pod Autoscaler https://kubernetes.io/docs/tasks/run-application/horizontal-pod-autoscale/

Scaling options for applications in Azure Kubernetes Service (AKS)https://docs.microsoft.com/en-us/azure/aks/concepts-scale